Discover the power of Python’s SMTP library for sending emails (Python send email tutorial). Learn how to effortlessly send HTML or plain-text emails to multiple recipients with seamless attachment support. The SMTPlib is the most popular Python SMTP library.
Navigate to specific topics instantly by clicking on the entries in the table of contents below.
- Python Email SMTP Library
- SMTP Sandbox Account
- Sending Email with Python via Gmail
- Send Plain-Text Python Email Example
- Send an HTML Email With Python
- Send Email With Attachments
- Send Email to Multiple Recipients
- SMTPlib Bcc , Cc, Reply-to
- Use a Variable on smtplib
- Errors
1. Python Email SMTP Library
The SMTPlib is most popular Python SMTP (Simple Mail Transfer Protocol) library. The smtplib is an in-built library in Python. It is part of the standard library, which means you don’t need to install any additional packages to use it.
2. SMTP Sandbox Account
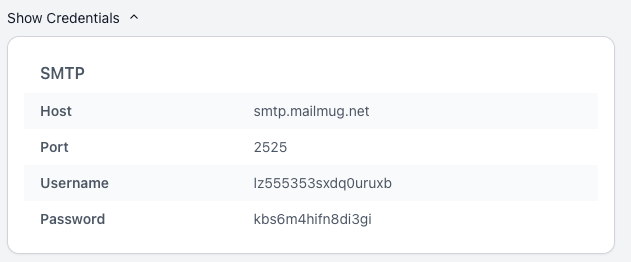
Unlock the benefits of MailMug’s complimentary SMTP sandbox account by signing up. Once your account is created, navigate to the Settings section, where you can conveniently copy and paste the provided SMTP credentials from your MailMug account for seamless integration.
3. Sending Email with Python via Gmail
Google (gmail) is providing free SMTP server. First, we need to enable two step verification for your gmail account.
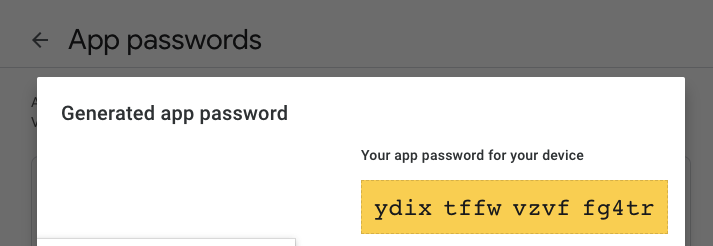
Next, generate an app password by following these steps:
- Visit your Google account settings.
- Navigate to the Security section.
- Select 2-Step Verification > App passwords (bottom).
- Create a new app password.

Now, input the credentials as outlined below.
Host: smtp.gmail.com

Username: youremail@gmail.com

Password: {app password}

Secure(SSL)

Port(465)
import smtplib, ssl

port = 465
password = "app password here"
context = ssl.create_default_context()

with smtplib.SMTP_SSL("smtp.gmail.com", port, context=context) as server:
    server.login("your-email@gmail.com", password)
4. Send Plain-Text Python Email Example
Create a main.py file then add the following code. Import smtplib, MIMEText and MIMEMultipart packages. The smtplib is helping to communicate with SMTP server. The email.mime.text is a submodule that provides classes for creating MIME (Multipurpose Internet Mail Extensions) objects. The MIMEMultipart is a class that represents a MIME multipart message.
import smtplib
from email.mime.text import MIMEText
from email.mime.multipart import MIMEMultipart


port = 2525
smtp_server = "smtp.mailmug.net"
login = "username here" # paste your login generated by mailmug
password = "pass here" # paste your password generated by mailmug

sender_email = "mailmug@example.com"
receiver_email = "new@example.com"
message = MIMEMultipart("alternative")
message["Subject"] = "Test subject"
message["From"] = sender_email
message["To"] = receiver_email


text = """\
    hi, How are you?
    """
part = MIMEText(text, "plain")
message.attach(part)

server = smtplib.SMTP(smtp_server, port)
server.set_debuglevel(1)
server.esmtp_features['auth'] = 'LOGIN DIGEST-MD5 PLAIN'
server.login(login, password)
server.sendmail(
    sender_email, receiver_email, message.as_string()
)
Python Send HTML Email
The Python HTML email template by MIMEText class. MIMEText(html, "html")
Change style by css codes in head section of the email html.
import smtplib
from email.mime.text import MIMEText
from email.mime.multipart import MIMEMultipart


port = 2525
smtp_server = "smtp.mailmug.net"
login = "username here" # paste your login generated by mailmug
password = "pass here " # paste your password generated by mailmug

sender_email = "mailmug@example.com"
receiver_email = "new@example.com"
message = MIMEMultipart("alternative")
message["Subject"] = "Test subject"
message["From"] = sender_email
message["To"] = receiver_email


html = """\
    <!DOCTYPE html>
<html lang="en">
<head>
    <meta charset="UTF-8">
    <meta name="viewport" content="width=device-width, initial-scale=1.0">
    <title>Your Email Title</title>
    <style>
        /* Add your styles here */
        body {
            font-family: Arial, sans-serif;
            background-color: #f4f4f4;
            margin: 0;
            padding: 50px;
        }

        .container {
            max-width: 600px;
            margin: 0 auto;
            padding: 20px;
            background-color: #ffffff;
        }

        h1 {
            color: #333333;
        }

        p {
            color: #555555;
        }

        /* Add more styles as needed */
    </style>
</head>
<body>
    <div class="container">
        <h1>Your Email Heading</h1>
        <p>This is a basic HTML email template. You can customize it to suit your needs.</p>

        <!-- Add your email content here -->

        <p>Thank you!</p>
    </div>
</body>
</html>
    """
part = MIMEText(html, "html")
message.attach(part)

server = smtplib.SMTP(smtp_server, port)
server.set_debuglevel(1)
server.esmtp_features['auth'] = 'LOGIN DIGEST-MD5 PLAIN'
server.login(login, password)
server.sendmail(
    sender_email, receiver_email, message.as_string()
)

Send Email With Attachments
Sending emails with file attachments is facilitated through the MIMEApplication class, specifically designed for encoding non-text characters. Utilizing base64 encoding, this class allows for the inclusion of file data. Retrieve the file data, store it within the MIMEApplication object, and seamlessly attach multiple files by iterating through the file array.
Import following libraries
from email.mime.application import MIMEApplication
from os.path import basename
The base basename is using to get filename from file path.
The Python Send Email with Attachemnts Example
import smtplib
from email.mime.text import MIMEText
from email.mime.multipart import MIMEMultipart
from email.mime.application import MIMEApplication
from os.path import basename


port = 2525
smtp_server = "smtp.mailmug.net"
login = "user name" # paste your login generated by mailmug
password = "pass " # paste your password generated by mailmug

sender_email = "mailmug@example.com"
receiver_email = "new@example.com"
message = MIMEMultipart("alternative")
message["Subject"] = "Test subject"
message["From"] = sender_email
message["To"] = receiver_email


html = """\
    <!DOCTYPE html>
<html lang="en">
<head>
    <meta charset="UTF-8">
    <meta name="viewport" content="width=device-width, initial-scale=1.0">
    <title>Your Email Title</title>
    <style>
        /* Add your styles here */
        body {
            font-family: Arial, sans-serif;
            background-color: #f4f4f4;
            margin: 0;
            padding: 50px;
        }

        .container {
            max-width: 600px;
            margin: 0 auto;
            padding: 20px;
            background-color: #ffffff;
        }

        h1 {
            color: #333333;
        }

        p {
            color: #555555;
        }

        /* Add more styles as needed */
    </style>
</head>
<body>
    <div class="container">
        <h1>Your Email Heading</h1>
        <p>This is a basic HTML email template. You can customize it to suit your needs.</p>

        <!-- Add your email content here -->

        <p>Thank you!</p>
    </div>
</body>
</html>
    """
part = MIMEText(html, "html")
message.attach(part)
files = ['my.jpg']
for f in files:
    with open(f, "rb") as fil:
        file_part = MIMEApplication(
            fil.read(),
            Name=basename(f)
        )
    file_part['Content-Disposition'] = 'attachment; filename="%s"' % basename(f)
    message.attach(file_part)


server = smtplib.SMTP(smtp_server, port)
server.set_debuglevel(1)
server.esmtp_features['auth'] = 'LOGIN DIGEST-MD5 PLAIN'
server.login(login, password)
server.sendmail(
    sender_email, receiver_email, message.as_string()
)
Send Email to Multiple Recipients
Sending emails to multiple recipients can be achieved by incorporating a list of email addresses into the receiver_email parameter within the smtplib library.
receiver_email = ["new@example.com", "new1@example.com"]
Complete code:–
import smtplib
from email.mime.text import MIMEText
from email.mime.multipart import MIMEMultipart
from email.mime.application import MIMEApplication
from os.path import basename


port = 2525
smtp_server = "smtp.mailmug.net"
login = " " # paste your login generated by mailmug
password = " " # paste your password generated by mailmug

sender_email = "mailmug@example.com"
receiver_email =  ["new@example.com", "new1@example.com"]
message = MIMEMultipart("alternative")
message["Subject"] = "Test subject"
message["From"] = sender_email

if isinstance(receiver_email, str):
    message["To"] = receiver_email
else:
    message["To"] = ", ".join(receiver_email)


html = """\
    <!DOCTYPE html>
<html lang="en">
<head>
    <meta charset="UTF-8">
    <meta name="viewport" content="width=device-width, initial-scale=1.0">
    <title>Your Email Title</title>
    <style>
        /* Add your styles here */
        body {
            font-family: Arial, sans-serif;
            background-color: #f4f4f4;
            margin: 0;
            padding: 50px;
        }

        .container {
            max-width: 600px;
            margin: 0 auto;
            padding: 20px;
            background-color: #ffffff;
        }

        h1 {
            color: #333333;
        }

        p {
            color: #555555;
        }

        /* Add more styles as needed */
    </style>
</head>
<body>
    <div class="container">
        <h1>Your Email Heading</h1>
        <p>This is a basic HTML email template. You can customize it to suit your needs.</p>

        <!-- Add your email content here -->

        <p>Thank you!</p>
    </div>
</body>
</html>
    """
part = MIMEText(html, "html")
message.attach(part)
files = ['my.jpg']
for f in files:
    with open(f, "rb") as fil:
        file_part = MIMEApplication(
            fil.read(),
            Name=basename(f)
        )
    file_part['Content-Disposition'] = 'attachment; filename="%s"' % basename(f)
    message.attach(file_part)


server = smtplib.SMTP(smtp_server, port)
server.set_debuglevel(1)
server.esmtp_features['auth'] = 'LOGIN DIGEST-MD5 PLAIN'
server.login(login, password)
server.sendmail(
    sender_email, receiver_email, message.as_string()
)

SMTPlib Bcc , Cc, Reply-to
Include ‘Cc,’ ‘Bcc,’ or ‘Reply-To’ information in the MIMEMultipart message, and it will be seamlessly added to the email header section.
Example:-
message["Bcc"] = "bcc@example.com"
message["Cc"] = "cc@example.com"
message["Reply-to"] = "cc@example.com"

Use a Variable on smtplib
Replace variables from HTML message by replace function as shortcode.
Example:
name = 'Any name here'
message = "Hi [name] \
How can I help you?"

message = message.replace('[name'], name)
TimeoutError Trying To Send an Email with SMTPlib
The smtplib TimeoutError indicates that the connection to the SMTP server timed out.
Check SMTP Server and Port:
- Verify that you are using the correct SMTP server address and port in your code.
- Check firewall configuration from your server
- Confirm that the specified port is open and accessible.
Use the Correct Security Protocol:
- If your SMTP server requires a secure connection, make sure to use the appropriate security protocol (e.g.,
starttlsorssl).
server.starttls()  # For STARTTLS
# or
server = smtplib.SMTP_SSL(smtp_server, smtp_port)  # For SSL
Increase Timeout Value:
- If the connection is consistently timing out, consider increasing the timeout value to give the server more time to respond.
server = smtplib.SMTP(smtp_server, smtp_port, timeout=30) # Adjust the timeout value as needed
Python SMTPAuthenticationError SMTPlib
The error message is SMTPAuthenticationError: 535, 534, or similar. It is caused by incorrect username or password. Solution: double-check your email account credentials.